Monday, March 1, 2010

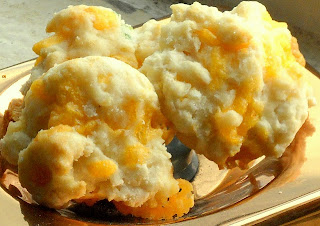
Crack in Cheesy form...or Amy's Garlic Cheddar Biscuits


I'm about to do something very, very bad. You're probably going to never speak to me again. You're probably never going to come back to this blog. And you're probably going to hate me. But since we are friends, I've got to be honest with you.

I'm addicted to garlic cheddar biscuits. And you're about to be too.

And I don't even care!

In a word, these things are amazing. The ingredients are right in your pantry. They're so simple to whip up, you can have yourself a batch in about 15 minutes. And I don't know what it is, but these little babies are just so good.

So when you're wondering what's going to accompany the chicken you're having for the fifth night in a row because it was on sale for $1.19/lb and we're in a recession and you just can't allow yourself to upgrade to the $2.99/lb chuck roast because it's too extravagant, you should make these. Your family won't even remember that you're having leftover leftovers!

That last paragraph might have been venting. I have given all of my funds for my education, and therefore, the betterment of society. I keep telling myself this and hoping that somebody will pay me something someday to do something. Maybe one day, I'll be able to afford a chuck roast.
And what a beautiful day that will be.

But I digress.

Come with me, my friend. Your life will never be the same.

Garlic Cheddar Biscuits
(yields about 12-15 biscuits)

*Click here for a printer-friendly version of this recipe*
  • 1 1/4 cup flour
  • 1/2 teaspoon baking powder
  • 1/3 teaspoon salt
  • 1/2 cup cheddar, shredded or cubed (I prefer cubed)
  • 1/2 cup milk
  • 6 tablespoons butter (3/4 stick), melted
  • 1/2 teaspoon garlic powder
  • parsley flakes, for garnish (if you're into that sort of thing)
Preheat oven to 350 degrees Fahrenheit.

In a large mixing bowl, sift flour, baking powder, and salt. Add cheddar and milk, and mix with a fork until well incorporated, when the dough follows the fork around the bowl. Place 1 tablespoon of dough on a greased cookie sheet, making sure the dough balls stay 2 inches apart. Place the pan in the oven and bake for 12-14 minutes, until cheese is melted and biscuits are golden.

While the biscuits are in the oven, make the garlic butter. Melt the butter, and stir in garlic powder and parsley (if using). When biscuits come out of the oven, immediate baste them with the garlic butter. Let them stand for a few minutes to absorb the garlic butter, and ravenously enjoy.


I'm sorry for what this might do to your thighs...and then I'm not sorry. Look at it this way: in your arsenal, you now have a recipe that is (1) quick and easy to make and (2) a definite crowd pleaser. And that's all any cook could ask for, right? Right?!

Right. At least I feel justified.

Happy cooking,
Amy

Friday, February 26, 2010

Great Deals at the Hip Hostess Site!

My friends, I have some exciting news! Debbie at The Hip Hostess has extended a generous offer to our readers. Until March 31st, readers of Three Peas in a Kitchen can enter the special promotional code 3PEAS (make sure it stays in all caps) to receive 20% off their entire order!

These would make WONDERFUL gifts for any fashionista in the kitchen. Also, check out their beautiful set of tea towels, which would be perfect for any bridal shower...or even as a gift to yourself. And don't forget about those adorable aprons for cooks in training!


This offer expires March 31st, so check them out soon. I know I will!


Loving some savings,
Amy

Thursday, February 25, 2010

This Is Amy's Grown-Up Christmas (or birthday...or whenever anybody wants to buy me a gift...) List

As a young adult, I have many dreams and aspirations. I want to go to graduate school. I want to have a family. In my wildest dreams, I would run my own dining establishment with all of my friends and be as merry as the day is long.


I also have a wish list. Yes, a culinary wish list. Actually, it's the only laundry list of things I want floating around in my head right now. I won't totally geek out on you and list everything, but I wanted to share these with you, my dear friends. Maybe you'll get them someday and show them to me. Maybe you'll even share them with me. Maybe you'll even buy them for me...


Sorry. I don't make friends just so they'll buy me things. Promise.

I promise!


This, my friends, is not a cute little sheath dress. It is, in fact, an APRON! And it is entirely too adorable for me not to own. It's part of the collection of aprons at The Hip Hostess. They also make aprons in small sizes, so you can get one for your daughter too. Better yet, you could MATCH!


Oh. Too cute. Way too cute. Must stop with the cuteness.
This is a beautiful cast iron dutch oven. Not only can you set these babies on the stove--they're safe to put in the oven as well! The iron allows for more even cooking. My grandmother's has lasted her for YEARS...and years...and years. Truth be told, I don't know how long she's had hers. But this is a good sign--they last for a while. That's my kind of cooking tool.


This beautiful specimen is a Calphalon stockpot. Again, there are SO many things I could do with this. I could make lots of stock for my beloved soups. I could make pasta galore without having to worry about the water boiling over. Maybe I could use it in the summertime for my attempts at canning. There are just so many possibilities.


This makes me giggle every time I look at it. HA! It's a silicone pot holder. It's probably one of the best things I have ever seen.

I am easily amused. Surprise, surprise.


I know, I know. But you know you've thought of this too.


Ahhh, to dream the impossible dream. Maybe not impossible...we'll see. I do want one though. And I would use it ALL THE TIME. But I don't have to justify that to you. I think you understand.

Right?

...

Right.

I'm curious: What's atop your culinary wish list?

Anxiously awaiting your responses so I can add more things to my wish list,

Amy

Tuesday, February 23, 2010

Amy's Creamy, Comforting Potato Soup

It's the tail-end of February. For the South, this means that Mother Nature teases us with the weather patterns, giving us spring-like temperatures one day and a blizzard the next. And for those blustery cold days, God gave us the ability to forage our supplies and make something to combat such weather.

And that, my friends, is potato soup.


For as long as I can remember, I have adored all things potato--much like the rest of the human race. And since I was a kid, my mom has made potato soup. Luckily for me, it was our go-to supper during the winter months, and my siblings and I would happily lap up every last drop--and then some. We would fight over the leftovers, which is something my mom relished.

The fighting over leftovers--not with each other. There were many punishments for those.

Those soup has garnered me many friends, and even helped me win an Iron Chef competition. A guy once told me it tasted like something his grandma would make. I think that was my proudest moment ever. It it my dream to become a terrific grandmother.

No, I'm serious.

Creamy Potato Soup (serves 10-12)
*Click here for a printer-friendly version of this recipe*
  • 8-10 russet potatoes, peeled and diced into 1-inch cubes
  • 1 onion, diced
  • 8 oz. cream cheese
  • 1 can cream of celery soup
  • 1 can cream of mushroom soup
  • 1 tsp. garlic powder
  • Salt and Pepper, to taste
  • Milk, to thin as desired
  • Cheddar cheese, as desired
  • Green onions, as desired
In a dutch oven or a large saucepan, boil potatoes and onions til fork-tender. Add cubes of cream cheese to mixture and stir until the cheese melts. To this mixture, add creamy soups. Add garlic, salt, pepper, and milk (if desired). Serve up the bowls, and garnish with cheddar and green onion.

Seriously, it's that easy. You could saute some carrots, celery, or mushroom and add them in. You could add a cup--or two--of cheddar, and it would just be lovely. That's the great thing about cooking--you get to adapt things to your taste. I'm just giving you the outline of your masterpiece.


And this soup is just so good, especially when it looks like that outside. I hope it warms your belly and spirit as much as it does mine!

Peas and love,
Amy

Sunday, February 21, 2010

Caitlin's Cupcake Sunday!


It's Cupcake Sunday here in a highly unusual 60 degree Nashville. 3 Days after my 21st birthday, I felt inspired to make a new batch of cupcakes. After extensive searching and inner reflection, I decided that I was going to try my hand at Snickerdoodle cupcakes. Now, to give credit where credit is due - I was inspired by Bakerella's Snickerdoodle Cookie/Cupcakes and Martha Stewart's Snickerdoodle Cupcakes. I actually followed Martha's recipe with a few minor alterations.

I went home to bake these delicious little guys. My mom has one of the best kitchen's around. "Never skimp on tools for your kitchen. Always pay up for the best quality - you won't regret it." Janet AKA Mother Pea. (This is probably not a direct quote - but it's good enough) So, my mother has provided me with an ideal workspace. #1 Item that I couldn't bake without:


A Kitchen Aid mixer is my favorite kitchen appliance. This guy can whip, blend, or do whatever else you want. It is the perfect baker's best friend. If you treat him (or her) well, it can do great things for you. I digress...

Like I said, I followed Martha's recipe.

Snickerdoodle Cupcakes with Cinnamon Buttercream (Makes 24)
*Click here for a printer-friendly version of this recipe*
  • 1 1/2 cups all-purpose flour
  • 1 1/2 cups cake flour (not self- rising), sifted
  • 1 tablespoon baking powder
  • 1/2 teaspoon salt
  • 1 tablespoon ground cinnamon, plus 1/2 teaspoon for dusting
  • 1 cup (2 sticks) unsalted butter, room temperature
  • 1 3/4 cups sugar, plus 2 tablespoons for dusting
  • 4 large eggs, room temperature
  • 2 teaspoons pure vanilla extract
  • 1 1/4 cups milk

Directions

Preheat oven to 350 degrees. Line standard muffin tins with paper liners. Sift together both flours, baking powder, salt, and 1 tablespoon cinnamon.

With an electric mixer on medium-high speed, cream butter and sugar until pale and fluffy. Add eggs, one at a time, beating until each is incorporated, scraping down sides of bowl as needed. Beat in vanilla. Reduce speed to low. Add flour mixture in three batches, alternating with two additions of milk, and beating until combined after each.


Divide batter evenly among lined cups, filling each three-quarters full. Bake, rotating tins halfway through, until a cake tester inserted in centers comes out clean, about 20 minutes.

Transfer tins to wire racks to cool completely before removing cupcakes. Cupcakes can be stored up to 2 days at room temperature, or frozen up to 2 months, in airtight containers.
To finish, combine remaining 1/2 teaspoon cinnamon and 2 tablespoons sugar. Using a small, fine sieve, dust peaks with cinnamon-sugar. Cupcakes are best eaten the day they are frosted; keep at room temperature until ready to serve.


What I changed: I didn't have my cake flour at home, sadly. So, instead I took 1 tablespoon of flour out of every cup called for in the cake flour part - and substituted 1 tablespoon of powdered cornstarch. I did this at the recommendation of many fine bakers on the internet. It is crucial to use this substitution, because this type of cupcake calls for a fluffier cake. Just using All-Purpose flour will create a much denser cake. (All this I learned today). This worked like a charm, and I will certainly use that sub. again.

It should also be noted that I am an eyeballer when it comes to measurements. So for things like vanilla, cinnamon, and salt - I generally just gauge it. I also used an organic cinnamon instead of a regular one - because I find the taste fresher and cleaner.

I also combined some cinnamon and sugar and the sprinkled it on the individual cupcakes before I baked them. This created a nice crunchy crust on the top of the cupcake under the icing. It's like a surprise crunch!

Now Martha's recipe calls from her Seven-Minute Frosting - which uses egg whites. I personally don't like meringue-like icing, so I went ahead and used my icing recipe from the last post with (again) some minor changes. Instead of using vanilla bean paste, I used pure vanilla extract and about 2 tablespoons of my organic cinnamon. Mix it all together and top the cupcakes. I am also a fan of sprinkling something on top of the icing - like my organic cinnamon.

Cooking Story: During this baking session, right when I was about to put batch two of the cupcakes in the oven - the power went off in my whole neighborhood. Dread came over me as I realized I had cupcakes in the oven, no icing, and no refrigeration. What to do...what to do. So I go out on the porch and partake in the customary "YOUR POWER OUT? YEAH. MINE TOO." - this is what always happens in our neighborhood. So, I come back inside and read my new Kindle for a bit. All the while, becoming more anxious at the thought of not being able to finish these little guys before I head back to school. But, the electricity gods where with me, and poof! Suddenly I had power again. My fears were quelled and as was well.

Back to present day - I am going to have these in the dorm if anybody wants one. Come on by - you are always welcome! Enjoy this wonderful weather and great natural light, Nashvillians. I fear it will not stay long. So, grab a cupcake and head outside.

Grace and Peace,
Caitlin

Friday, February 19, 2010

Cultured Cupcakes

Guess what. So those cupcakes I posted yesterday? They are the featured item on Pioneer Woman's Tasty Kitchen Dessert Page. Amy called me into her room and we both proceeded to scream and jump around. So exciting. Go check it out!

http://thepioneerwoman.com/tasty-kitchen/recipes/categories/desserts/

Grace and Peace,
Caitlin!
Publish Post

Thursday, February 18, 2010

Caitlin's Customary Cupcakes

Last 4th of July I decided to make a batch of berry-decorated cupcakes. From there, my love of cupcakes only grew. I started making all kinds of cupcakes: vanilla, mocha, pumpkin, peppermint. I would bake them on Sunday at my house and then bring them to school and pass them out. There never had to be an occasion, just a love. I now have a wonderful collection of cupcake themed things that I gathered in the past year.

Through all of this, one cupcake recipe has stood out among the rest. On a whim, I decided to make almond cupcakes. I didn't know if they would work out at all, but the cupcake muses were with me that day - and this recipe was born. So, I give to you, wonderful readers, my most treasured recipe for Almond Cupcakes with Ultimate Buttercream Icing and Topped with Cinnamon. (Yields 18, so you might want to double it)


Almond Cupcakes with Ultimate Vanilla Buttercream (makes 18)
*Click here for a printer-friendly version of this recipe*

2 cup of flour
2 1/2 tsp baking powder
1/8 tsp. salt
1 cup of unsalted butter, soft
3 1/2 oz. almond paste
1 cup of sugar
1 cup of milk
3 large eggs
1 tsp. vanilla
Preheat to 350.

Whisk together flour, baking powder, & salt. In another bowl, mix butter, almond paste & sugar until light & fluffy - 3 minutes. Add eggs 1 at a time. On low, alternately add milk & flour mixture. Stir in vanilla. Fill cups 2/3 full and then bake for 15 - 20 minutes or until done.
I know it sounds weird to use almond paste - but it really works. You need to heat it up a little to make it pliable before you use it. In the store it is normally in the highest, furthest corner of the baking isle - near the marzipan and other such things. I really wouldn't try and substitute almond extract for the paste - it would make it too runny. But, if you want a more almondy flavor, I am sure you could add some extract in too.

Now let those puppies cool completely before piping on this awesome butter cream (Yield 2 c.)

1/2 cup unsalted butter, softened
2 teaspoons vanilla bean paste
1/8 teaspoon salt
1 (16-oz.) package powdered sugar
3 to 5 Tbsp. milk

Cream the butter, vanilla bean paste, and salt together. Alternately add powdered sugar and milk until creamy. You may need to add in some more milk or sugar until you get a consistency you want. I like a really stiff consistency just so my ridges in the icing don't fall apart. Then pipe on the icing with a fun wavy tip. Sprinkle cinnamon on top for added flavor and prettiness.
I love these, and I hope you do to! Let me know what you think.


Grace and Peace,
Caitlin